Available in TurboCAD Platinum Only
...
This functionality provides the means to attach one or several blocks to window and doors to provide additional geometry e.g. a window sill, door knob, shutters.
You can attach custom block to entire window/door or to different parts.
To make a door with components you must create the block first. The block used for this must be composed only of ACIS solids.
Multiple muntin blocks can be assigned to each style. This allows you to have different patterns of muntins for each panel of glass, or to combine muntin patterns.
To setup muntins component please do the following:
...
This dialog contains list of all blocks assigned to the door or window style.

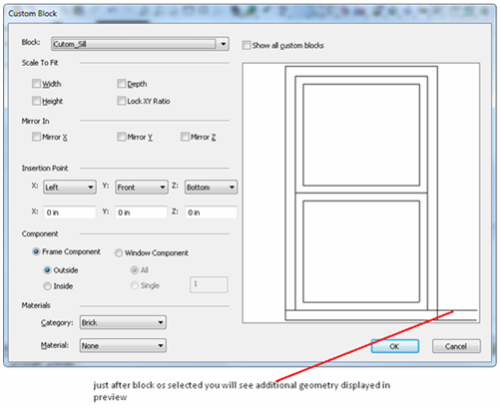
Custom Block Dialog
...
Disable Blocks: When ON - custom blocks are ignored.
Add: displays Custom Block dialog to add new custom block.
Edit: displays Custom Block dialog to edit selected custom block
Remove: deletes selected custom block
Blocks list: contains list of blocks attached to the window style.
Custom Blocks Editor

Block combo-box: Used for selecting the block (from the list of blocks) that is attached to the window/door style.
Scale To Fix Controls Group
Width check box: when ON - block is scaled to fit window/door width.
Height check box: when ON - block is scaled to fit window/door height.
Depth check box: when ON - block is scaled to fit window/door depth.
Lock XY Ratio check box: works in combination with one of the (Width, Height, and Depth) check boxes.
For example, when Width is ON and you click Lock XY Ratio the block is scaled in a way to keep XY ratio.
Mirror In Controls
Mirror X check box: mirrors block relative X axis.
Mirror Y check box: mirrors block relative Y axis.
Mirror Z check box: mirrors block relative Z axis.
Insertion Point controls group
X: combo-box: Defines how block is attached relative to window/door in X Axis (to Left Side, Center or Right Side)
Y: combo-box: Defines how block is attached relative to window/door in Y Axis (to Back Side, Center or Front Side)
Z: combo-box: Defines how block is attached relative to window/door in Z Axis (to Bottom Side, Center or Top Side)
X: Y: Z: edit boxes: define the offset from block origin point
Component Controls Group
Frame Component:
Outside - block is attached to entire window
Inside - block is attached to inside frame
Window Component
All - block is attached to all window component
Single - block is attached to single window component
Materials Controls Group
These controls allow define material that will be used for this custom block in render.
Example of use
...
Suppose you would like to create custom sill for our window style.
Create a block.
First, we create a geometry for our sill (just a box with 10x2x0.2 in size

...
NOTENote: Block used for Custom Blocks must be composed of ACIS solids. For best results align your block with the origin of the drawing.
Make Block
Select the box and select Format | Create Block.
Enter "Custom Sill" as the Block name and click OK.

Navigate to the style manager palette, select Standard window style and click the Block property in the properties of the window style.
The Custom Block dialog opens. It contains a list of all the blocks that are attached to the window style.

Click the Add button to add new block to the window style.
The Custom Block Editor dialog opens.

Click the Block combo-box and select the desired block.

Right click on the preview pane to display pop-up menu and select Isometric_SE item from it (to have better point of view)

Now let's adjust the block size and position.
Check Width check box (to scale the block width to the width of window).
Select Back from Y: combo-box (to place the block to back side of window)

Click OK.
Click OK again.
Now create a wall in drawing and insert a window (of Standard style) into it.
