...
Layers are virtual levels in a drawing, analogous to acetate tabs (overlays) in traditional drafting. Layers enable you to sort objects in your drawing by type, by creation order, or by any criteria that suits the way you work. You can also use layers to protect certain objects from being edited or deleted.
...
Panel
...
Setting Up Layers
There are two primary ways of creating and editing layers. The Layer manager, and Design Director which is only available in the Pro product. With regard to layers you can do essentially operations with either.Open the Layer manager by selecting Format / Layers, or by clicking the Layers icon on the toolbar.
This dialog is used to create layers, to assign properties to each layer, and to organize layers. It is divided into two frames. The first frame show the tree containing the layer filter, and layer templates. The second frame show the layers. controlled or derive from the item selected in the tree. The top node of the tree controls and shows all layers in the drawing.

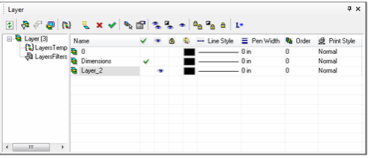
Layer 0 is the default layer, and all objects are placed here unless otherwise specified, or unless another layer is created and made active. Layer $CONSTRUCTION is created when construction geometry is created (see Construction Geometry). Neither of these default layers can be deleted, but you can change their properties.
...
Columns in Layers window: Use the horizontal scroll bar to see all columns. You can sort the list by clicking on any column heading; the list will be sorted according to the selected parameter.Anchor
Visibility (eye icon): Check to make objects on the layer visible. *ReAnchor
Read-only (lock icon):* Check to make the layer read-only, so that objects cannot be edited or deleted. You can add objects to a read-only layer via the Layer drop-down list on the TurboCAD Layers toolbar.
Color: Click on the the color box to open the color dialog, then select a color - The default color is black. Objects will have the layer color if their color is set to By Layer.
Style: Select the line style from the drop-down list and double-click to set it. Objects will have the layer style if their style is set to By Layer. *OrAnchor
...
Warning: The Draw Order commands will not function as you expect if objects are on different layers and the layers have different Order values.
...
VP Columns in Layers window: In addition to the main columns in the Layers window there are five columns with a VP prefix. VP stands for Viewport, and these columns are use to control how objects will appear within a selected viewport.


The columns are: VP Visible, VP Color, VP Line Style, Pen Width, Print Style.The VP columns operate in the same way as the main columns, except the settings effect on selected viewports.To use the VP column settings:
- Open the Layer Manager.
- Go to Paper Space.
- Select the Viewports you wish to configure.
- Apply the settings in the VP columns of the Layer Manager.
...
NOTENote: Remember that settings which control object appearance via the Layer Manager (e.g. VP Color) only affect the properties objects which are set to By Layer.
...
...
Layer Manager Toolbar
Refresh: Refresh the Layer manager display.
...
Layer Prefix: By default, the layers are named "Layer 1, Layer 2," etc. You can change or remove the prefix. The @ symbol is a placeholder for the automatic layer number.
Note: Many of the functions available from the Layer toolbar are also available by right clicking and opening the local menu.
...
...
Creating a New Layer
- , then assign a name for the layer in the Layer column (or accept the default name).
- Adjust the various layer settings, such as color and line style.
...
Deleting a Layer
Anchor
...
In some cases, objects on deleted layers will be moved to Layer 0, rather than be deleted. If an object exists on Layer 1 in both Paper Space and Model Space, and Layer 1 is deleted from Model Space, in Paper Space the object will be moved to Layer 0. This is due to different Undo buffers for Model and Paper Spaces.
...
...
Layer Templates
Layer templates allow you to create and save alternate configurations for layers. Layer templates store how layers are setup, but do not store layers thenselves. Layer templates are saved in a *.lrs file which can be stored anywher in you system directory.