Scaling Objects in Select Edit
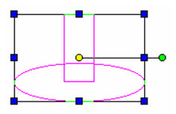
The easiest way to scale objects is to select the objects, then click and move drag handles. You can also enter scale values for relevant axes in the Inspector Bar.
Note: To scale (or copy) objects relative to specific points or objects, see Transforming.
Tip: If you are scaling an ACIS solid object, you can specify uniform scaling or enable scaling in all axes - see ACIS.)
- Select the objects you want to scale.
- If you want to maintain the aspect ratio (the ratio between X, Y, and Z), select Keep Aspect Ratio from the local menu or click the icon on the Inspector Bar.
You can also maintain the aspect ratio by clicking a drag handle and pressing Shift while resizing. - Click one of the drag handles to resize, or enter the scale and size in the Inspector Bar.
You can use Keep Center of Extents when scaling. This option forces all scaling to occur relative to the center of the object. If this option is off all scaling will occur relative to the reference point.
Note: You can make a copy by clicking the drag handle, pressing Ctrl, and then resizing.
Click on a corner handle to scale in more than one dimension.
Click on an interior handle to scale in one dimension only.
- When the objects are resized, click anywhere or press Esc to exit Select mode.
----Note: If the object you are scaling contains double lines or lines drawn with a pen width greater than 0, the results of scaling a selection will vary, depending on whether you are using Geometric or Cosmetic selection. For accurate results, use the default Geometric select mode. See Geometric and Cosmetic Select Modes.
For any documentation issues please email:
Documentation@imsidesign.com


